


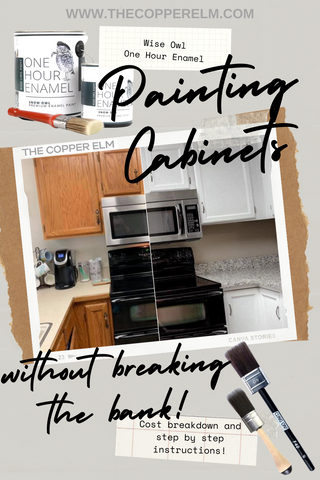
Paint Your Kitchen Cabinets Without Breaking the Bank
A Great Kitchen Sells a House!
We've all heard a Realtor preach about the value of a great kitchen. It's the heart of the home, so if you are planning to spruce up your space before putting it on the market, a kitchen makeover will give you the biggest bang for your buck. But while renovations in a kitchen are the most likely to increase a home's value, they also come at a steep price. The national average for a kitchen reno is just over twenty-five thousand dollars. And 29% of that big price tag...gets poured into the cabinets. With an almost $7,000 average dedicated to cabinetry, that much-needed kitchen makeover can be daunting, if not unfeasible. But what if you could refinish your cabinets yourself, getting that same fresh look while saving 95% of your costs? I know, it seems impossible, but stick with me...
Why Choose Wise Owl?
This amazing kitchen overhaul was done with Wise Owl Paint products and it made all the difference. Their One Hour Enamel (you can find it here) begins the curing process in just an hour, which means no more waiting weeks before re-hanging your cabinet doors! It also just so happens to be insanely durable so unlike other cabinet paints, you don't have to avoid your kitchen for a month to avoid dings and scratches. From start to finish, including prepping, priming, painting, and installation, you can give your kitchen a complete makeover in just a weekend.
It's also water-based and low VOCs so you won't put your family or pets at risk while painting and to me, that is HUGE! And as a bonus...the top-coat is built right in so no more fussing with finicky varnishes or yellowing urethanes!
So, what does it take to completely overhaul your kitchen cabinets?? Keep reading and I'll break down the entire process, step by step, and layout all the products used (including a couple from the dollar store to save you even MORE cash!!).
Painting Kitchen Cabinets:
Cleaning-
First, and most importantly, you need to get your cabinets clean. Kitchen cabinets tend to be coated in oils, grease, grime, and residue and nothing affects paint adhesion more than a coated surface!! So before you even think about picking up a paintbrush, it's time to start scrubbing. I prefer to take down all my doors and drawer fronts first, remove all the hardware (including hinges), and mark a little note inside the hinge cutouts so you know exactly where to rehang the doors when you are finished. Once they are down, grab a good cleaner and a scrubby pad and get to work. I prefer a degreaser to eat away at the built-up grime. I've got two favorites that I tend to switch back and forth on. One is a little pricey but eco friendly, the other is more budget-friendly but requires better ventilation.
For a hardworking cleaner that won't risk your health, my go-to is "The Amazing Whip-It". You can find it here and also at select Sam's Clubs and Walmarts. It's plant-based, has virtually no smell, and is strong enough to even eat through paint.
A more budget-friendly option comes from Dollar Tree and is called "LAs Totally Awesome Cleaner". It is pretty stinky, likely not so health-friendly, but it does a great job of cutting through caked on grease and grime. If you don't have a Dollar Tree nearby, you can find it in the giant jugs here. This is sold as a concentrate and needs to be diluted, so follow the instructions on the bottle to avoid damaging your cabinets. I prepare mine as a strong degreaser so it will degloss my surface as I clean. (Just be sure to mark the bottle clearly so you don't mistakenly use this elsewhere and cause damage to other surfaces in your home!)

Next, grab a pick or small flat head screwdriver and run the edge along any joints or crevices in your doors to pull out every last bit of gunk. Anything left on the surface can pop back up later to cause issues....so now is the chance to get a clean slate! Be sure to flip the doors over and scrub the backsides as well. Once everything is fresh and clean, give it one more wash with plain water. You want to wash off any trace of the cleaning chemicals, so a fresh tap water rinse is important. (Any residue left behind can cause adhesion issues in the following steps, so taking the extra time to wash with clean water can save major headaches down the road.)
Sanding-
Once your cabinets have fully dried, it's time to sand. Most cabinets don't need to be sanded down to the bare wood, but if your surface was previously painted, you'll want to spend a bit more time here. If the paint is chipping, bubbling, or pealing, you'll need to fully remove it either by using a chemical stripper (I recommend GreenEZ Stripper followed by the Cleaner to remove the oil residue) or by sanding to bare wood. If the cabinets are simply varnished, then you'll likely just need a quick scuff sanding to give your surface a little tooth for the primer to grip to. A medium grit sanding sponge is perfect for this, but you can grab a power sander if you'd like to speed the job up! Pay a little extra attention to the trim pieces and edges. These are the areas that are most likely to get banged up, so giving them a little heavier sanding will allow the primer and paint to adhere more, giving you a bit more protection in the long run. Again, be sure you sand both sides of each door. Once you're finished sanding, grab some water and a rag and give one last wipe-down to remove any sanding dust. Any dust left behind can show up in your paint job, so spend a little extra time here to be sure the surface is clean. (An air compressor comes in handy here to blow the dust off the surface and out of the crevices!)
Priming-
Now that your surfaces are cleaned and scuffed, you can grab your primer. When using Wise Owl's One Hour Enamel, it's important to use their primer as well, as they were engineered to work together. If you use a different primer, especially one with a shellac base, it can cause your enamel to crackle or chip.

Wise Owl Primer comes in four color options and your choice can make a huge difference in the amount of paint needed to complete the job.
- White - Use when painting your cabinets a neutral, light, white-based color.
- Clear - Use if you will be distressing your paint to show the wood beneath, or if painting the cabinets a shade very similar to their current color.
- Gray - Use for light neutrals with gray tones, light oranges, or underneath light red-based colors (soft pinks, pale reds, etc).
- Dark Gray - Use under any darker color including blacks, grays, navys, reds, and deep oranges.
A quart of primer will cover 125 sq ft, so an average kitchen will use about two quarts of primer, although it is important to calculate your surface area to ensure you are getting enough product. If you need help with this, you can send me an email with the number of doors and drawer fronts you have, plus photos of your kitchen and I can help estimate the products needed.
Using a brush or a roller, whichever you are more comfortable with, apply in thin, even coats, allowing to dry for at least 4 hours before applying a second coat. The primer is dry to the touch in most conditions in about an hour, so if you are looking to complete your project as quickly as possible, you can do the first coat of primer, allow it to dry for an hour, then flip them over and do the backsides. Keep track of the time and once you've hit that 4-hour mark, you can flip the doors back over and apply your second coat. If you plan to work in an assembly line fashion like this, I highly recommend grabbing some painting pyramids (like these) to rest your doors on. These will allow your surface to be raised off your workspace without doing any damage to your primer or paint job. If you are concerned about adhesion, it is always best to allow the primer to dry longer than recommended. For slicker surfaces, I prefer to go 6-12 hours between coats, and 24 hours before painting.
One important thing to keep in mind when applying the primer is to wipe up any drips as soon as possible. I like to apply the primer to one side of the door, and then run my finger along the underside (against the surface facing my workspace) to catch any drips and smooth out any excess primer before it begins to dry. Baby wipes work especially great for this as well!! If you do find drips or imperfections after the primer has dried, grab your sanding paper and smooth them out before painting.
Painting-
Once your two coats of primer have been applied and have dried for at least 4 hours (longer if needed), you are ready to start painting! The One Hour Enamel (found here) comes in a wide array of beautiful colors that can be purchased in quarts and gallons. A gallon of enamel will cover 400-450 sq ft, so the average size kitchen will typically use right around a gallon. (Remember to calculate the front and back of each door, plus the cabinet bases for your square footage totals!)

To apply the enamel, I prefer two tools. I use a 4" flocked roller from Whizz (the gray, velvet style roller meant for cabinets...I get mine at Lowes) and a Cling On brush. The F40 Cling On is a great option for cabinets, but I'm also a huge fan of the S30. The smaller S30 gets into all the crevices and does a great job of smoothing out the excess paint, while the F40 is perfect for those larger flat surfaces. I highly recommend you do a test door to see what application technique feels best for you. Some folks swear by the roller, some feel more comfortable with a brush. For me, I prefer both so that's what I'll dive into for this post.


Start your cabinet doors with the backsides first. This allows you to get comfortable with your technique on a side that you won't be staring at daily once they are hung up! I prefer to do the inner corners and crevices first with my S30, and then immediately jump in with a roller after. To do the flat panels of your doors, grab your roller and give it a dunk in your paint. I let the excess drip off a bit, and then go ahead and roll it onto your surface. You may see tiny bubbles or bumps pop up as you roll....give it about 20-30 seconds and then do a VERY light pass one more time with the roller to pop anything that's risen. The enamel dries insanely fast (90% CURED in one hour!!) so the MOST important thing to remember is to not overwork your paint, lay it on there, and let it be! You'll want to apply the enamel slightly heavier than you might if you were using a chalk-style paint, to allow for the full self-leveling magic to happen, but be super careful to avoid drips. Once that enamel dries, it is ridiculously hard to remove so you'll want to wipe up drips and excess spots as soon as possible. Again, a quick swipe of the finger on the underside of your door will usually wipe up any possible issues.
When painting cabinet doors with floating panels, be careful to not allow the paint to pool in the seams. These doors are meant to move as the wood expands and contracts, which is common as humidity levels in the home fluctuate. If the paint is built up in those seams, the floating panel is no longer able to move, and as the wood expands, your paint may crack, bubble, or chip. This can happen with any paint product, so be careful to avoid a heavy build-up of paint in these areas!
Allow your paint to dry for one hour (slightly longer depending on your humidity levels or the color chosen...darker colors may require a bit longer dry time) and then apply a second coat in the same fashion. I allow my second coat to dry for a few hours before flipping them over to do the other side. (Let's be honest....by this point, you may be exhausted and just let them dry overnight to give yourself a break!) Flip your doors and repeat the same process on the fronts of the doors. For most colors, two coats are plenty but assess your coverage and if needed, add a third coat to take care of any inconsistencies.
Allow to dry for another few hours while you repeat the process on your cabinet bases and trim and then....you....are....done!!! Seriously! That's it! The enamel has a rock hard topcoat built right in so you don't need to varnish, wax, or poly at all. Your doors are now ready for hardware and all set to be hung back up.

To Recap-
The average kitchen is going to require 2 quarts of primer and one gallon of enamel coming to a grand total of about $220. Throw in the Cling On brushes I love so much (the F40 and S30) and your brand new kitchen is costing you around $280. Factor in another $30 for painter's tape, plastic covering, paint pyramids, cleaners, and sandpaper. Even if your kitchen is twice the average size and needs twice the paint and primer, you are still looking at a $500 project....far less than the $7,000 average!
Are you still intimidated about painting your kitchen cabinets? Why not start a little smaller? You know what Realtors say is the second biggest return on home renovations, right?? Yep, and those bathroom cabinets are a GREAT place to learn how to paint.

(This post contains affiliate links. These links don't cost you an extra penny, but clicking them to check out products and make your purchases helps my small business out in huge ways. I ALWAYS stand behind my recommendations and I don't promote products that I don't truly believe in. Thanks so much for the support!)


